Workshop context
Before this workshop
- We have built an app that displays a random styled quote when the user clicks a button.
This workshop
- We will add an option for the user to submit their own quote for styling.
After this workshop
- This is the last workshop in the series, and in fact, the last workshop in the three series that built this app. Congratulations, you’ve reached the end of the road. 😊
Workshop goal
By the end of this workshop:
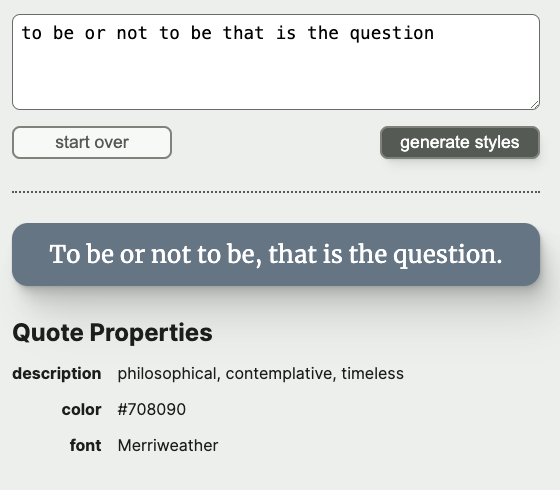
- The user will be able to enter a quote and receive a styled quote with the grammar and gendered language corrected.
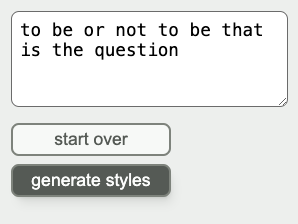
- if the text input is populated, then the button on the right should read “generate styles”
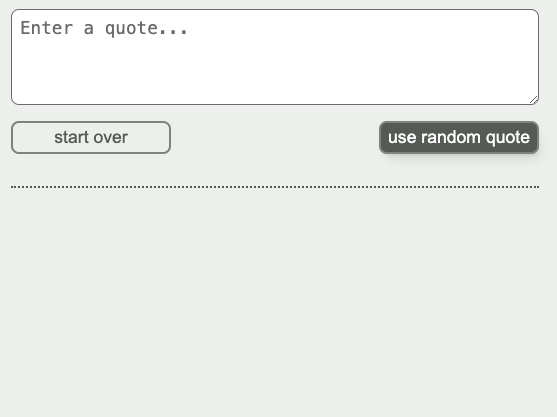
- if the text input is empty, then the button on the right should read “use random quote”
- if the text input is populated, then the button on the right should read “generate styles”
- The user can clear the existing entered quote and styled quote display by clicking a “start over” button on the left. This button should use the “outline” variant.
- The
textareashould take up the full available width, be6remhigh, have padding and border-radius of 0.5rem, and a font size of 1.1rem. The placeholder text should be “Enter a quote…“. - When the screen is wide enough, the “start over” button should line up with the left side of the input, and the other button should line up with the right side of the input.
- When the page doesn’t have enough room for both the “generate styles” and “start over” buttons to be in the same row, put them in a column:
Warning: ⚠️ This is a lengthy, challenging workshop with a lot of moving pieces! Be patient with yourself and go step by step. Even if you can’t finish it and look at the solution, you’ll still get a lot out of the workshop.
Hints
Hint 1
Create a new component called QuoteForm, by either using npm run new-component QuoteForm (on MacOS or Linux) or by using the new-component README to create the files manually (sorry, Windows users).
Move the “use random quote” button there from the Home component in src/app/page.tsx, and add QuoteForm to the Home component where the button used to be.
The QuoteForm component needs a prop, namely fetchQuoteStyles. If you’re not sure what type to give this prop, hover over the item in the return value from the hook (in src/hooks/use-quote-styles.ts) and VSCode will show you the type:

Hint 2
The textarea for the quote can be a controlled input , using a quote state internal to QuoteForm.
To prepare to pass the quote text to the server on the fetch call, update fetchQuoteStyles from the custom hook to take an optional string input. Then pass the quote state value value when you invoke fetchQuoteStyles from QuoteForm.
Hint 3
Within fetchQuoteStyles, send the quote state value to the server as a query string . If the quote value is a non-empty string, you can append the query string to the URL. If the quote values is an empty string, don’t add a query string. That way, the route handler will know to use a random quote if there is no query string with the request.
Hint 4
Create another return value for the hook in in src/hooks/use-quote-styles.ts called startOver, which is a function clears all of the quote properties and any error state. Use this in the QuoteForm component as part of the “start over” button onClick.
Hint 5
In the route handler in src/app/api/get-quote-styles/route.ts, add a request parameter and then get the search params using request.nextUrl.searchParams. (The searchParams are an interface for the key/value pairs of the query string.) See this example to get started.
If the quote param is populated, use that value for the quote; otherwise, use a random quote. Note the .get() method will return null if the key is not present in the searchParams.
Hint 6
If you’re not sure how to handle the responsive design for the buttons, check out this flexercise , which covers this very topic. 😄
Note: in that exercise, the “generate styles” button comes first (on the left or top), and in this exercise, the “start over” button comes first (on the left or top). Otherwise the code is the same.
Resources
- MDN docs on textarea
- React docs on controlling a text area with a state variable
- URL query paramters in Next.js route handlers
- Josh W. Comeau’s blog post, An Interactive Guide to Flexbox – great for understanding what flexbox is all about.
- A Complete Guide To Flexbox from CSS Tricks – where I go when I need quick visual reference for which flexbox properties and values I want.